An open-source, end-to-end toolkit for reconstructing interactable indoor 3D scenes. Scan a room with the iOS app; the agent turns it into a complete, graphics-ready scene with articulated assets.
Intro and background
About a year ago, we introduced LiteReality, a system that turns a real-world scan into a graphics-ready environment. The goal was to make reconstruction compatible with the traditional graphics pipeline, so a scanned room could drop straight into downstream applications like gaming, simulation, and virtual reality.
Much of that effort went into a handcrafted pipeline that included layout parsing, asset retrieval, and material painting, all stitched together to achieve a realistic result. While it worked to some extent, it was difficult to scale to more challenging environments and could only capture what it had been specifically designed to handle.
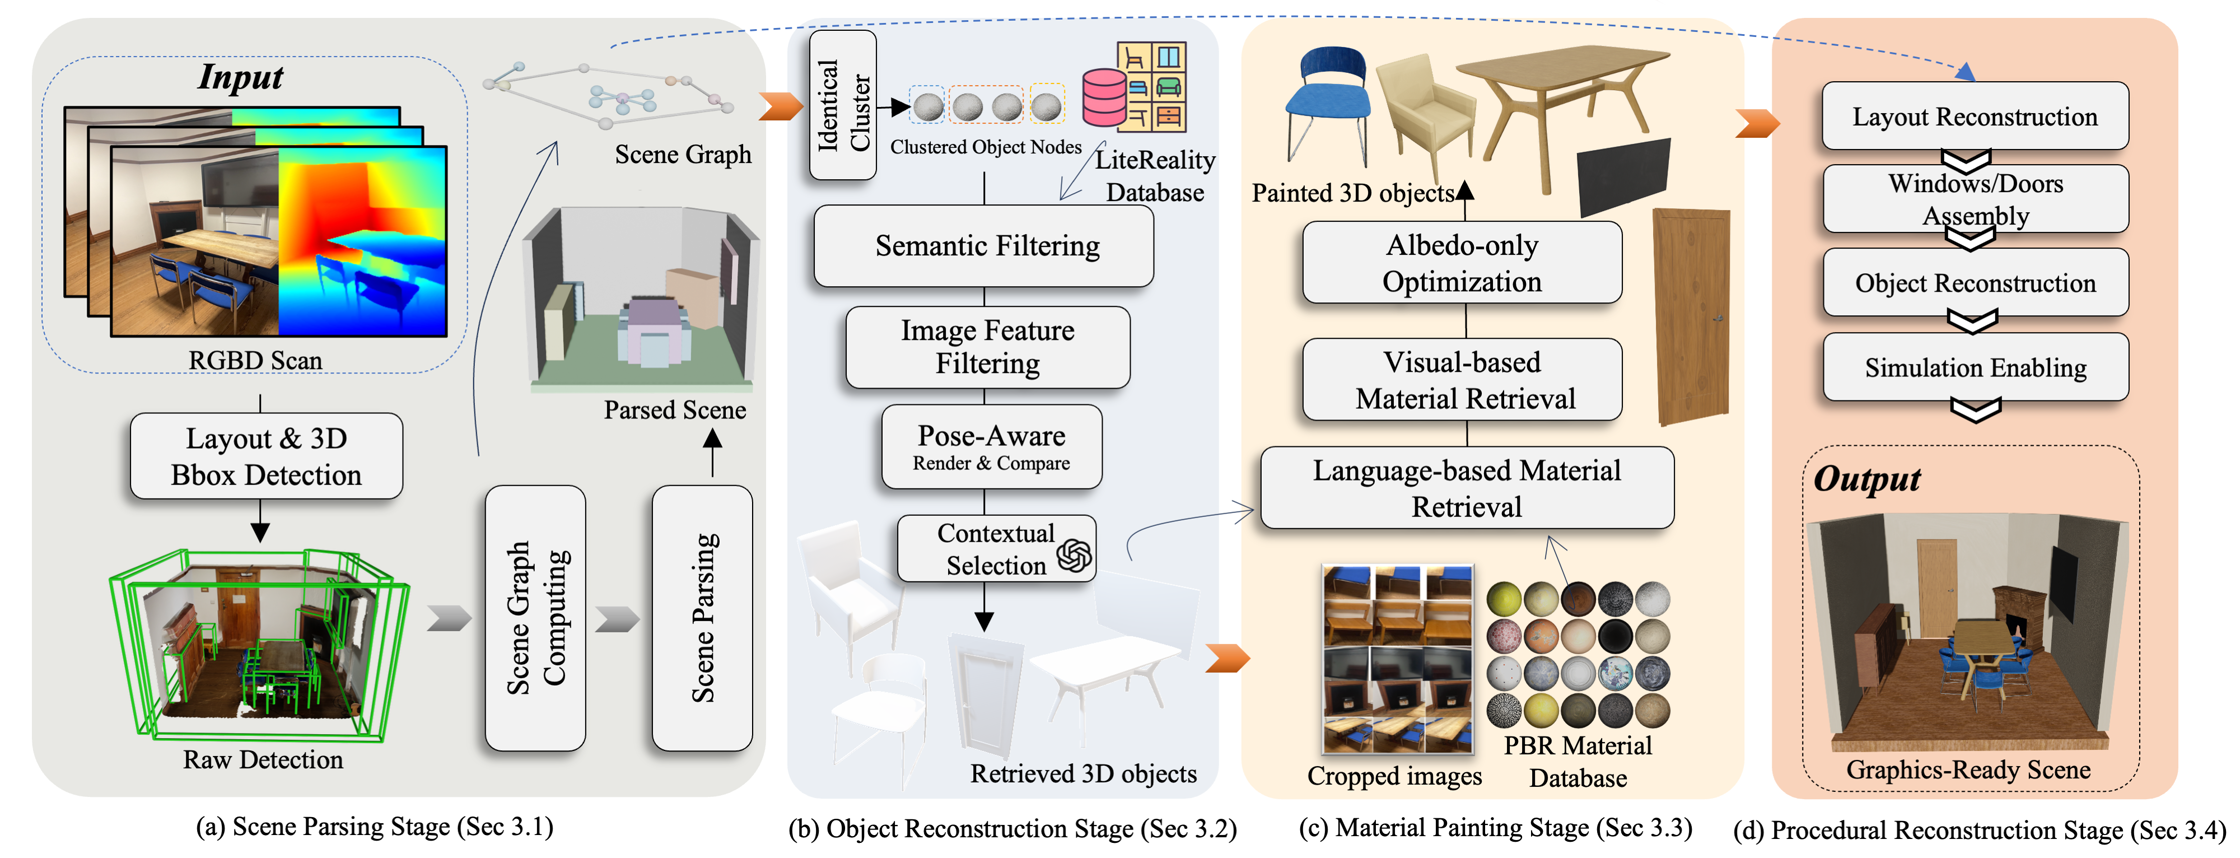
This year, we have witnessed a surge in the capabilities of coding agents for 3D modelling. Projects such as ArtiCraft, along with startups and tools such as Moonlake and BlenderMCP, have demonstrated the impressive things agents can achieve in 3D modelling. While generating visually compelling 3D content from text prompts is relatively easy, faithfully reconstructing an environment grounded in reality remains much more difficult. This is especially true at the room or building scale, where the agent must coordinate a large amount of scan data across different viewpoints and spaces while preserving geometric and spatial consistency. This is why most existing work in this domain focuses on generation or reconstruction conditioned on a single image.
Why We Want to Do This
We believe there is a lot of value in turning real-world scans of rooms into interactive 3D scenes. There are two use cases that make the most sense to us.
1. Recreating a Place You Know is cooler than purely generative
People often have a stronger connection to places they are already familiar with — the rooms where they have spent time, made memories, or shared experiences with others. Because of this, a reconstructed real-world space can feel more meaningful and engaging than an entirely generated environment, even when the reconstruction is not perfectly accurate. A familiar room could, for example, be turned into an interactive space where users can meet friends, rearrange furniture, test different decorations, or visualise possible renovations. Standard mesh or Gaussian reconstructions can capture the geometry and appearance of a space, but they cannot offer this kind of interactive experience. What could be interesting is a representation that balances these properties: it should remain visually realistic and recognisable while also being structured, editable, and interactive, in a form closer to how 3D environments are built in traditional graphics pipelines.
2. Reality-grounded simulation built fast
Another motivation is the possibility of significantly reducing the cost of building reality-grounded simulation environments. There is still a gap between an interactive scene and a fully simulation-ready one, but we believe this gap is manageable through continued engineering work. If this process can eventually become fast and reliable enough, it could offer an interesting way to adapt robots to the specific environments in which they operate.
Imagine a robot entering a new room and having a realistic simulation of that space built from a scan within a short period of time. That simulation could then be used to train, test, or fine-tune the robot's policy for that particular environment. This may be especially relevant in real-world deployment settings, where a robot is likely to remain in the same home, office, warehouse, or hospital for a long time and repeatedly perform a limited set of tasks. In such cases, adapting, or even overfitting, the policy to that specific room could be practical.
We do not yet know how useful this approach will be in practice, but making reality-grounded simulation faster and more accessible gives us a concrete way to test this idea.
The Gap is real: there is no such tool for this
There are many possible motivations for this work, and several of these hypotheses still need to be tested in real experiments/user feedback. But the current gap is clear: there is no open-source, end-to-end tool that lets users scan an indoor space and turn it into an interactive 3D environment.
Anyone who wants to do this today usually has to build their own pipeline from scratch. These systems are often fragile, hardly work, or require a large amount of human effort to fix afterwards. LiteReality aims to bridge this gap by providing a full-stack toolkit for the entire process.
In this release, we provide two main components:
- LiteReality App, a scanner for capturing indoor spaces.
- LiteReality-Agent, an agentic system that takes the captured scan and turns it into an interactive 3D scene.
How does it work
3.1 LiteReality App
For the scanning device, we chose LiDAR-equipped iPhones and iPads because they are widely available consumer devices that can capture both visual and geometric information about an indoor environment.
The app combines two Apple frameworks. ARKit provides the low-level, frame-by-frame sensor data, while RoomPlan provides a higher-level structural understanding of the room. During a scan, ARKit gives us camera frames together with per-frame depth measurements, camera calibration, and the estimated position and orientation of the device. RoomPlan uses the device's camera and LiDAR scanner to identify the main structure of the room, including walls, floors, doors, windows, and openings, as well as bounding boxes and semantic categories for recognised furniture and appliances.
The LiteReality App is designed primarily as a data-capture tool. It does not perform the full scene reconstruction on the device. Each scan contains:
| Output | From | What it is |
|---|---|---|
| RGB frames | ARKit | the camera images captured through the sweep |
| Depth & confidence maps | LiDAR | per-frame depth, with a confidence map alongside it |
| Camera parameters | ARKit | per-frame intrinsics, poses, and timestamps |
| Point cloud | derived | a 3D point cloud reconstructed from the RGB-D observations |
| USDZ layout | RoomPlan | the room layout, plus the dimensions, categories, positions and orientations of detected objects and structural elements |
Together, these outputs cover most of the information we would expect from a practical scanner. We make the LiteReality App freely available and allow users to access the full package of data, whether they want to use it with LiteReality-Agent or with their own reconstruction pipeline.

3.2 LiteReality-Agent
LiteReality-Agent has two stages:
- a deterministic scene initialisation stage; and
- an agentic realism-authoring stage.
Scene Initialisation
The scanner provides a RoomPlan USDZ file containing the room layout and bounding boxes of the main objects. Following the original LiteReality pipeline, we reconstruct each object separately and then compose them into a complete room.
The object stage is where the two diverge. LiteReality retrieved objects: it searched a curated database of artist-made models and picked the closest visual match, which meant a room could only ever be furnished with what the database already held. Here nothing is retrieved. Every object is reconstructed from the scan's own images of it.
For each object, the system collects reference images from the scan and routes it to one of two branches:
- procedural generation for objects that require structured geometry, articulation, or interaction; or
- TRELLIS-based image-to-3D generation for visually complex or mostly static objects.
Procedural assets are generated using an adapted version of ArtiCraft with Blender Python as the scene language. Adapting it also means we inherit a good deal of its quality control over generated assets, and some of its progress towards simulation-readiness. Once all assets are created, they are placed into the room using the positions, orientations, and dimensions estimated from the scan. The resulting scene then becomes the starting point for the agentic authoring stage.
4. The Agentic Authoring Loop
The second stage takes the initialised room and iteratively improves its realism through an agentic authoring loop.
Our authoring loop follows several key design principles:
-
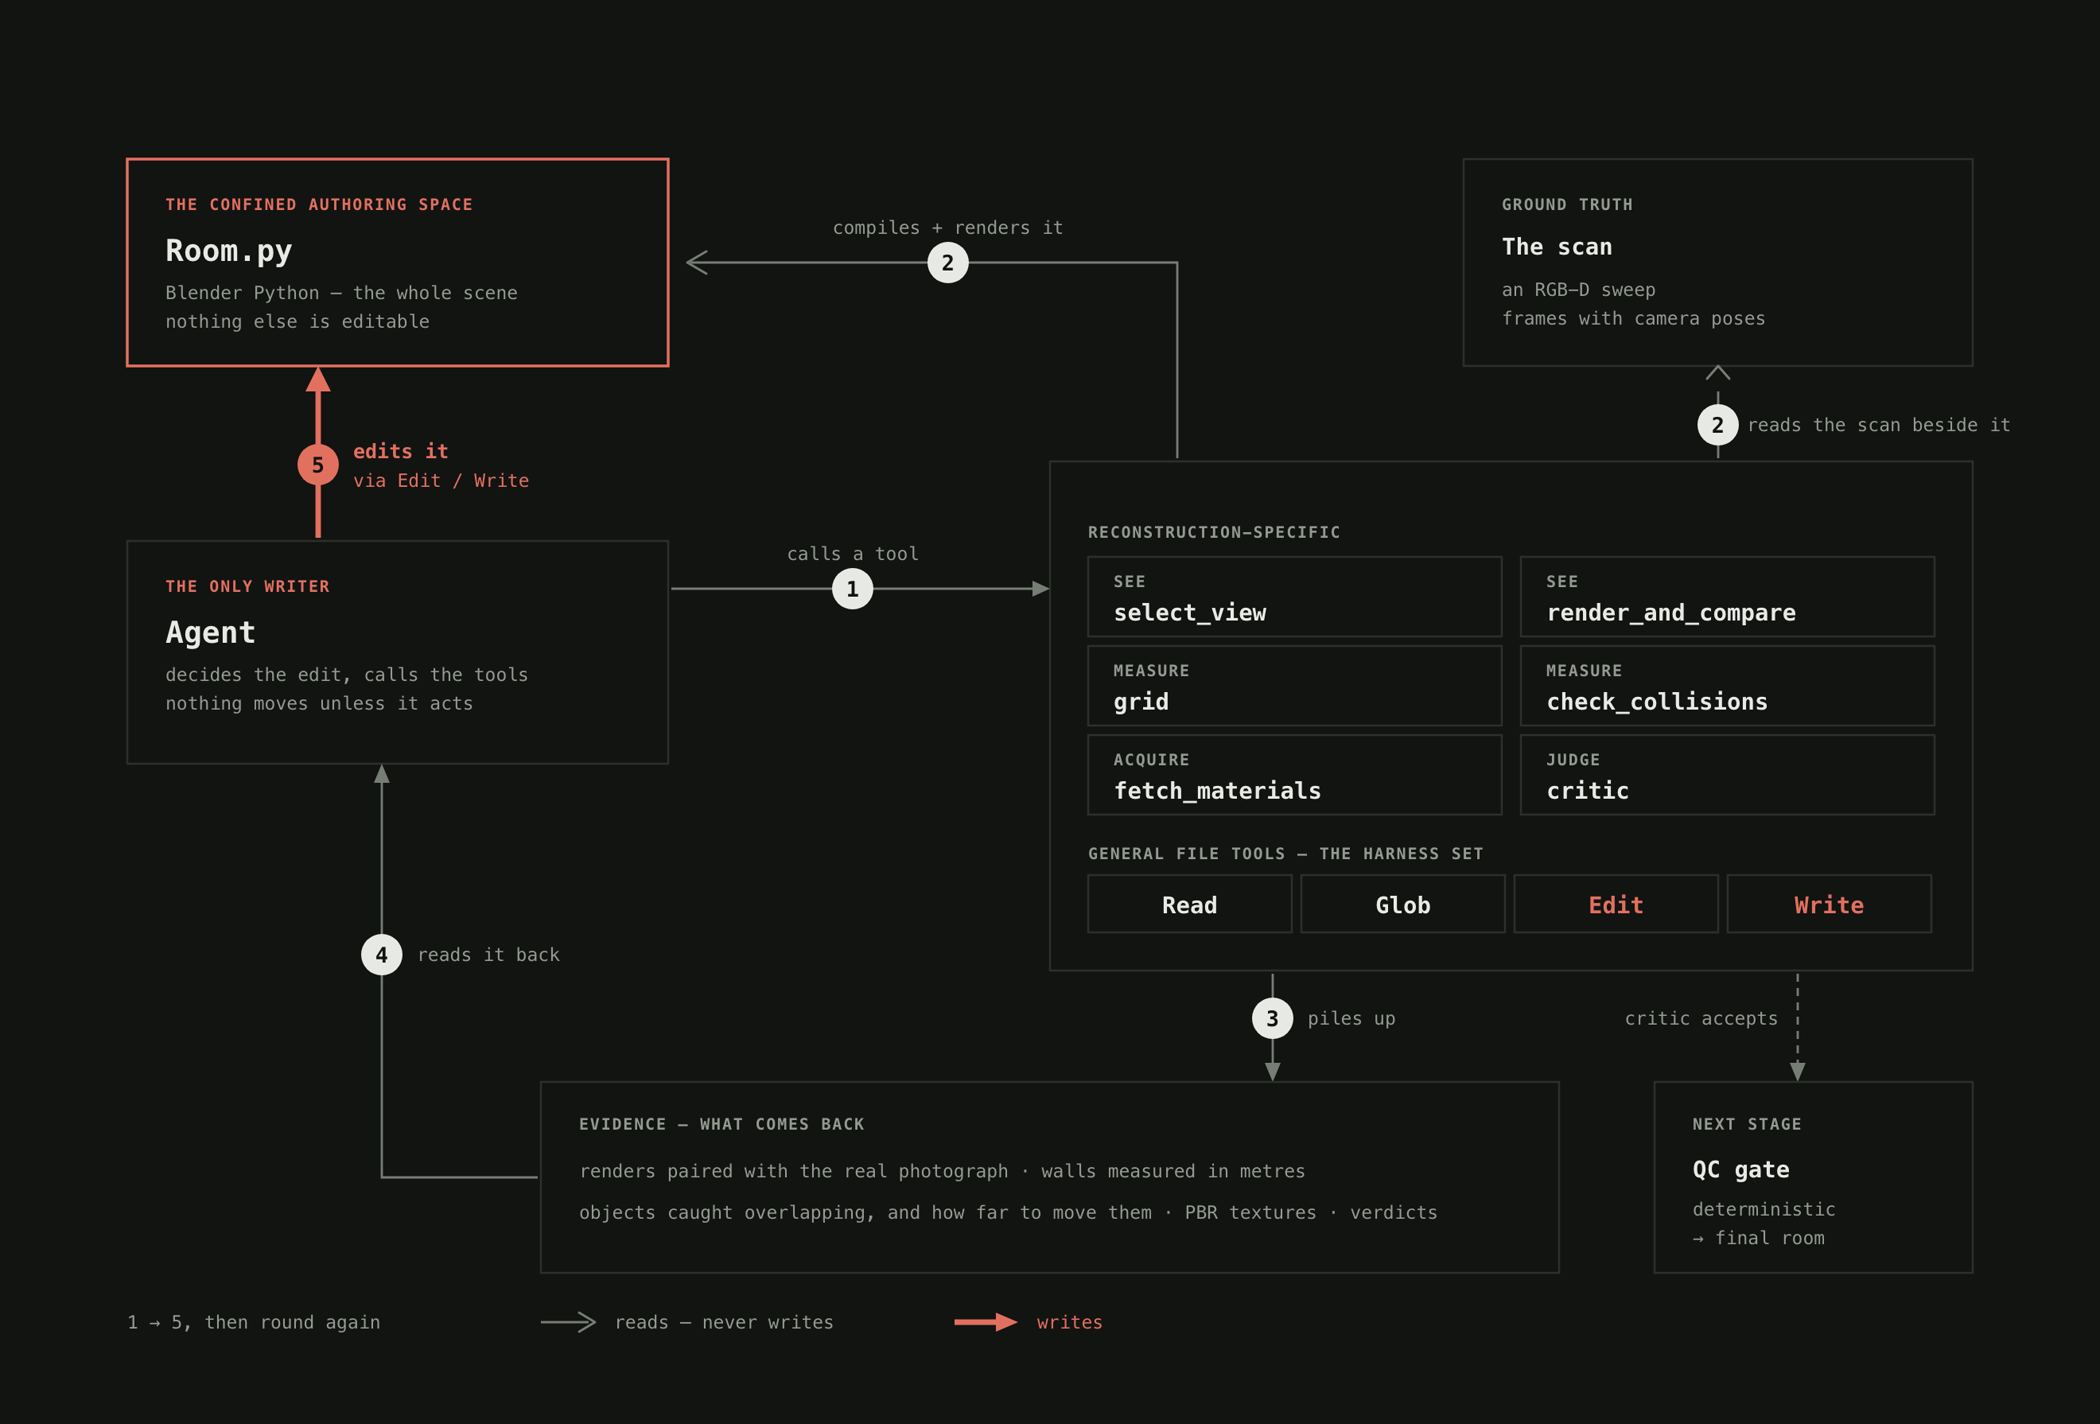
A confined authoring space. The agent operates primarily on
a single
Room.pyfile — a Blender Python script that defines how the room is constructed. - Task-specific tools. We provide a set of tools designed specifically for this task. The agent can call them freely to gather and inspect evidence, make decisions, and edit the scene accordingly.
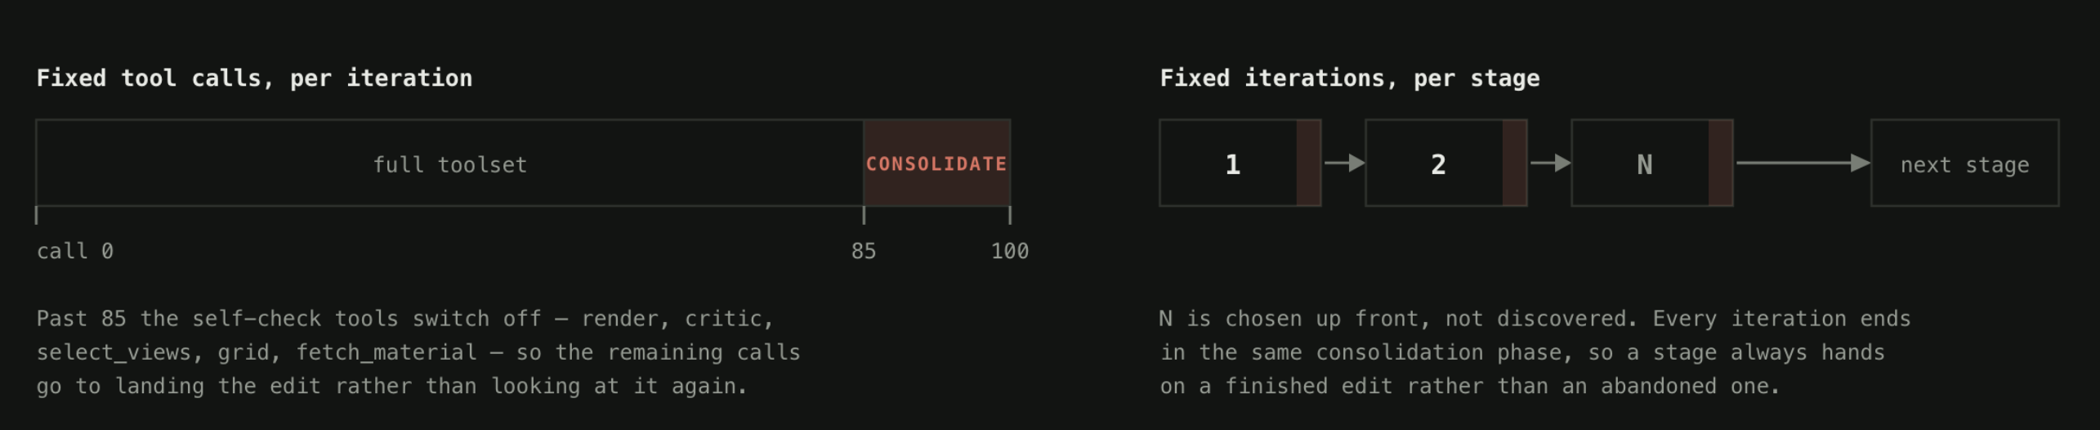
- A structured iteration process. Because it is difficult to define a clear stopping condition for realism, we specify a fixed number of tool calls and refinement iterations. As the agent approaches the end of each iteration, it is explicitly instructed to consolidate its edits and complete the current refinement stage.
- A modular workflow. The pipeline is divided into independent stages. It begins with refining wall PBR materials and fixtures, followed by improving the objects constructed during initialisation. Finally, the room passes through a series of quality-control checks to ensure the output meets a consistent standard.
The tools
A closed set, designed for this task. Click one to see what it does.
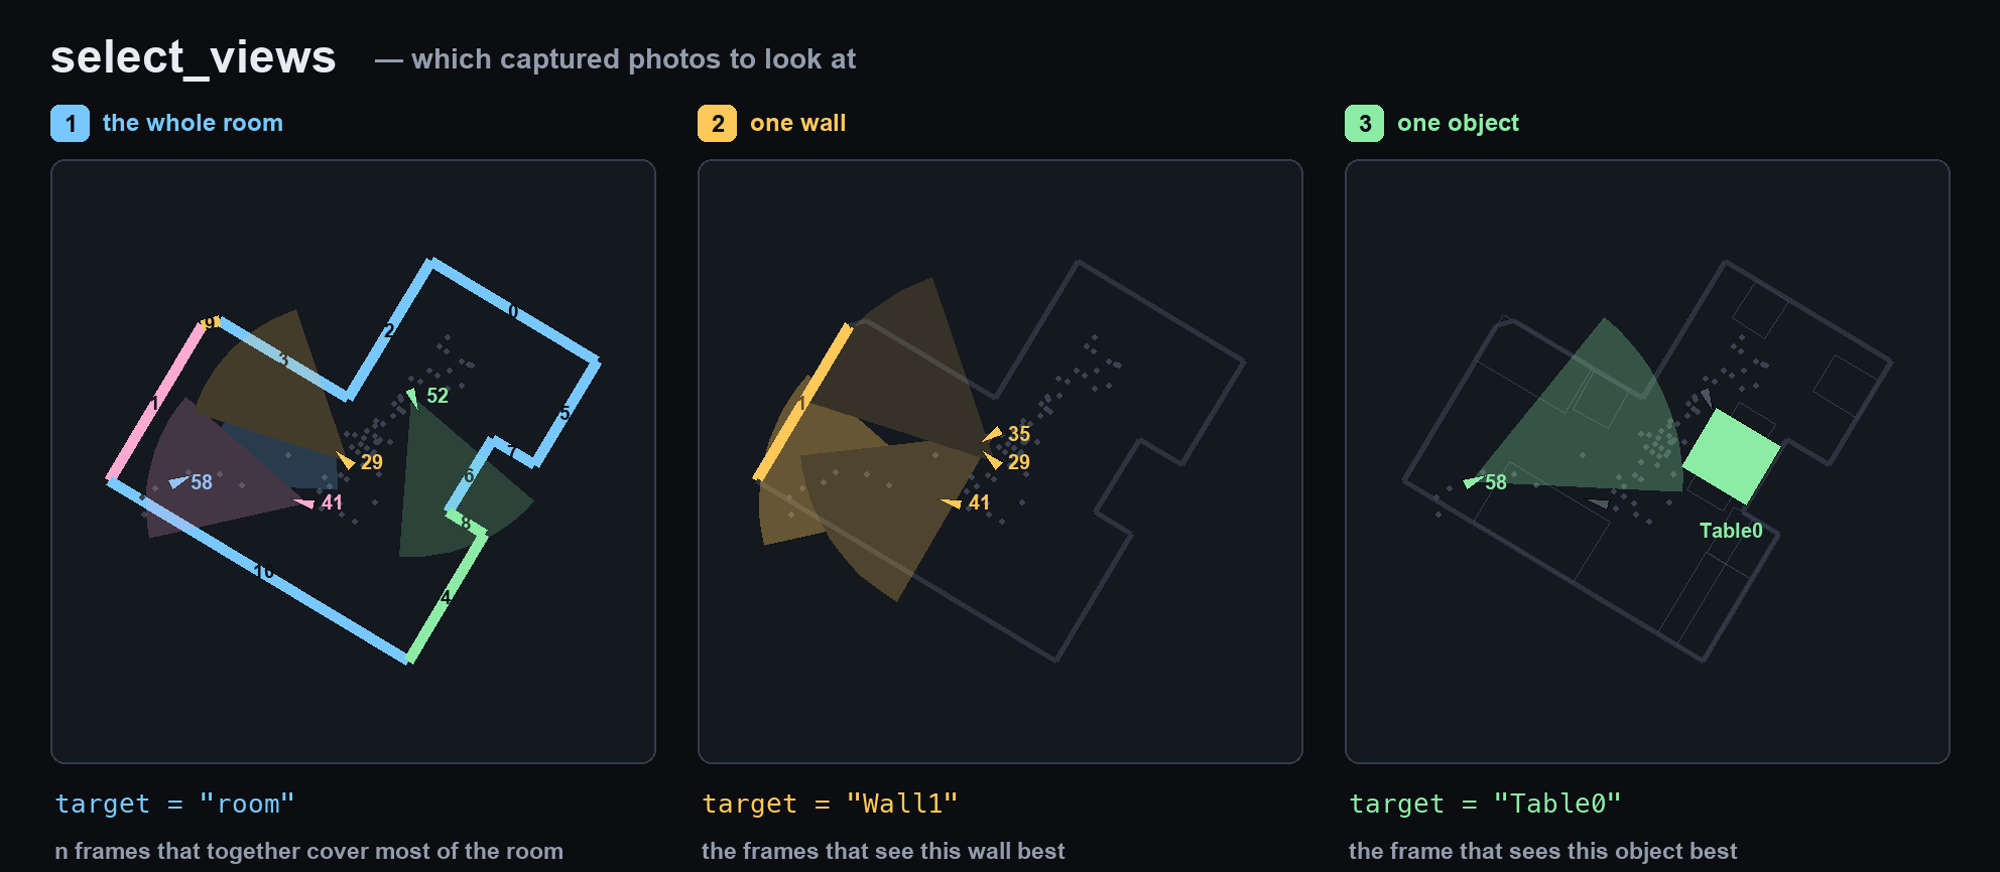
Which of the sixty-odd capture frames to actually look at. Ask for the room and it returns the fewest frames that between them see every wall; ask for one wall or one object and it ranks frames by how much of it they see. A model asked to pick a frame number just guesses.
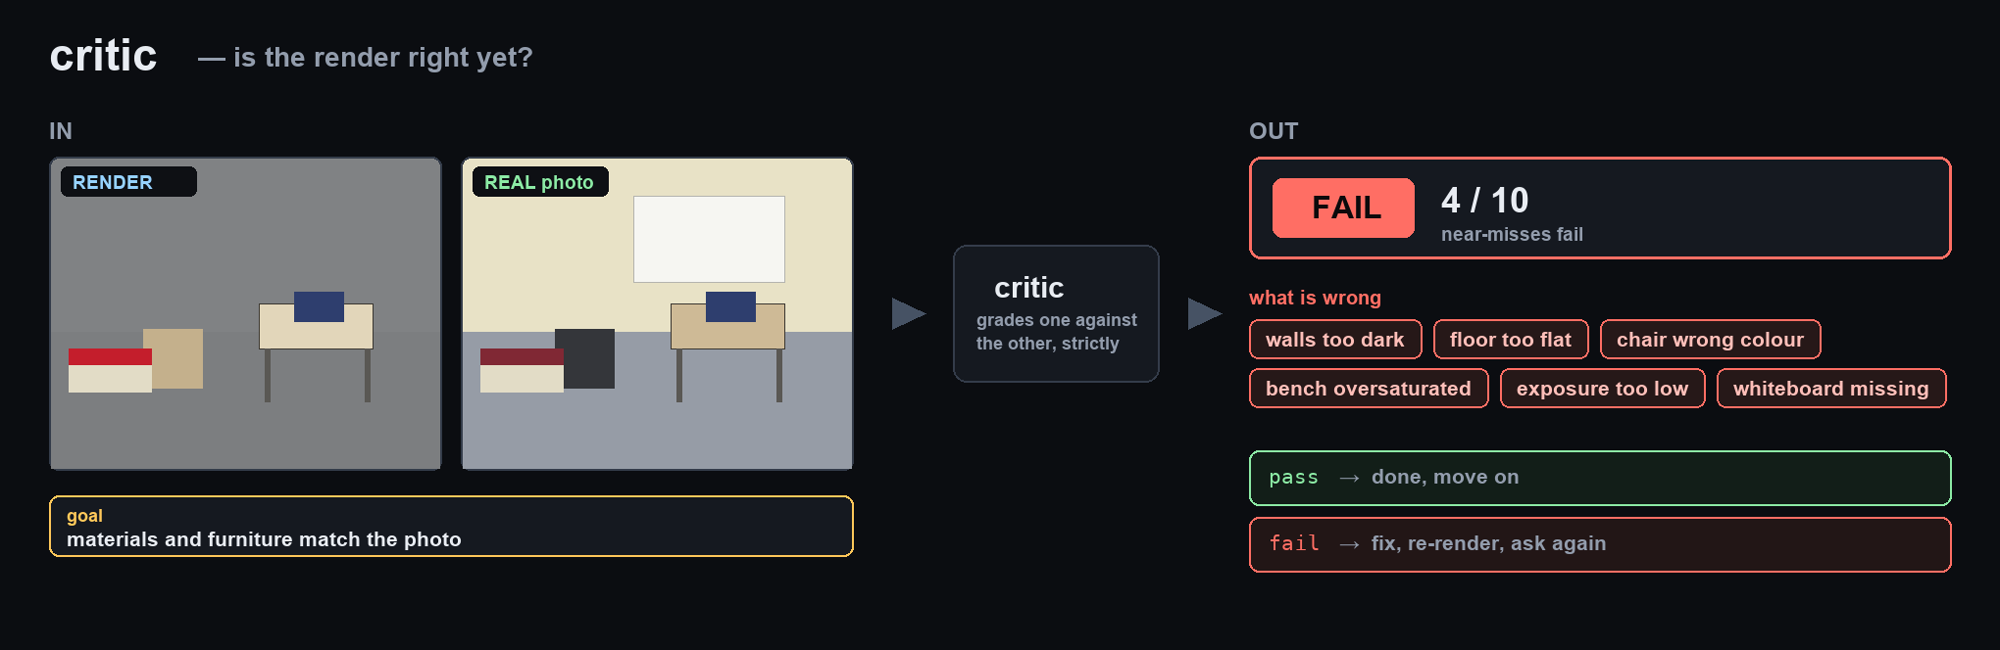
The render beside the real photograph, from the same camera pose, with the annotation narrowing as the question narrows — whole room, one wall, one object. The model is never asked to align two pictures in its head.
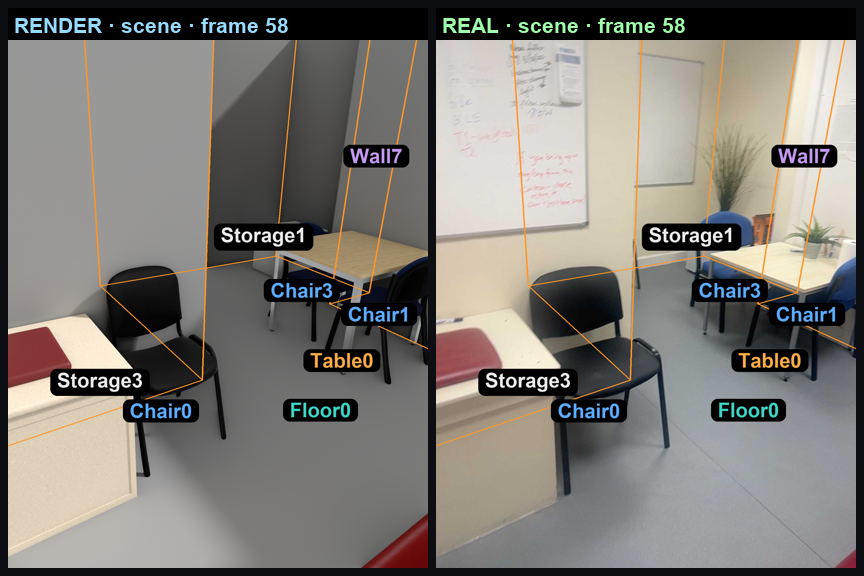
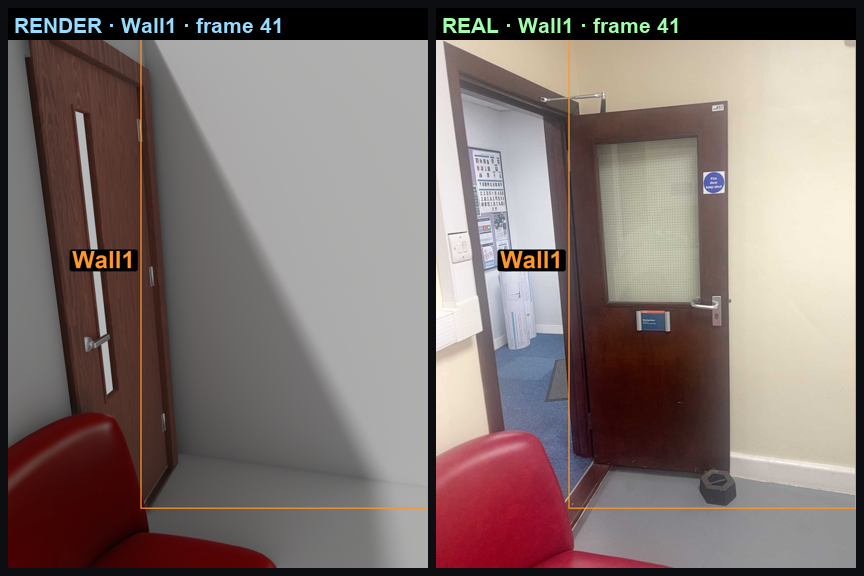
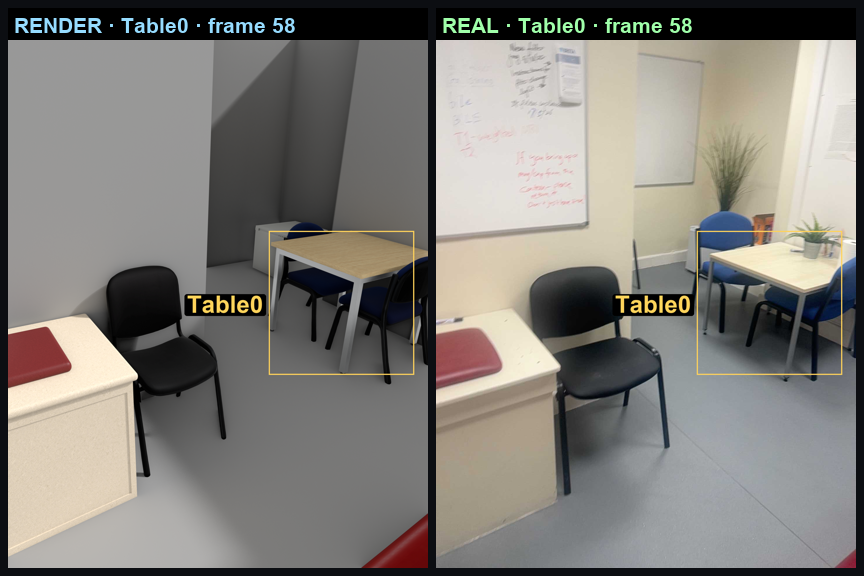
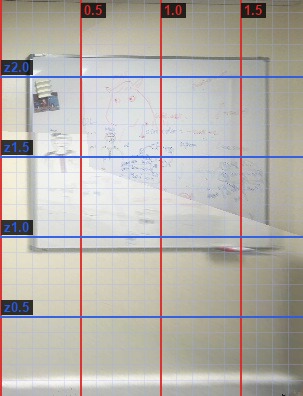
A metric ruler drawn on a rectified wall: metres along the wall in red, metres above the floor in blue. Reading beats estimating, and the numbers you read are the numbers that go into the scene. The agent invented this one — it hand-rolled the same thing in Bash thirteen times in a single run before it existed as a tool.
A verdict the loop can branch on, rather than prose: pass or fail, a score, and a list of what is wrong. The tool owns the grading prompt — not the agent — so strictness is a property of the system instead of whatever the model felt like asking for that turn. Near-misses fail.
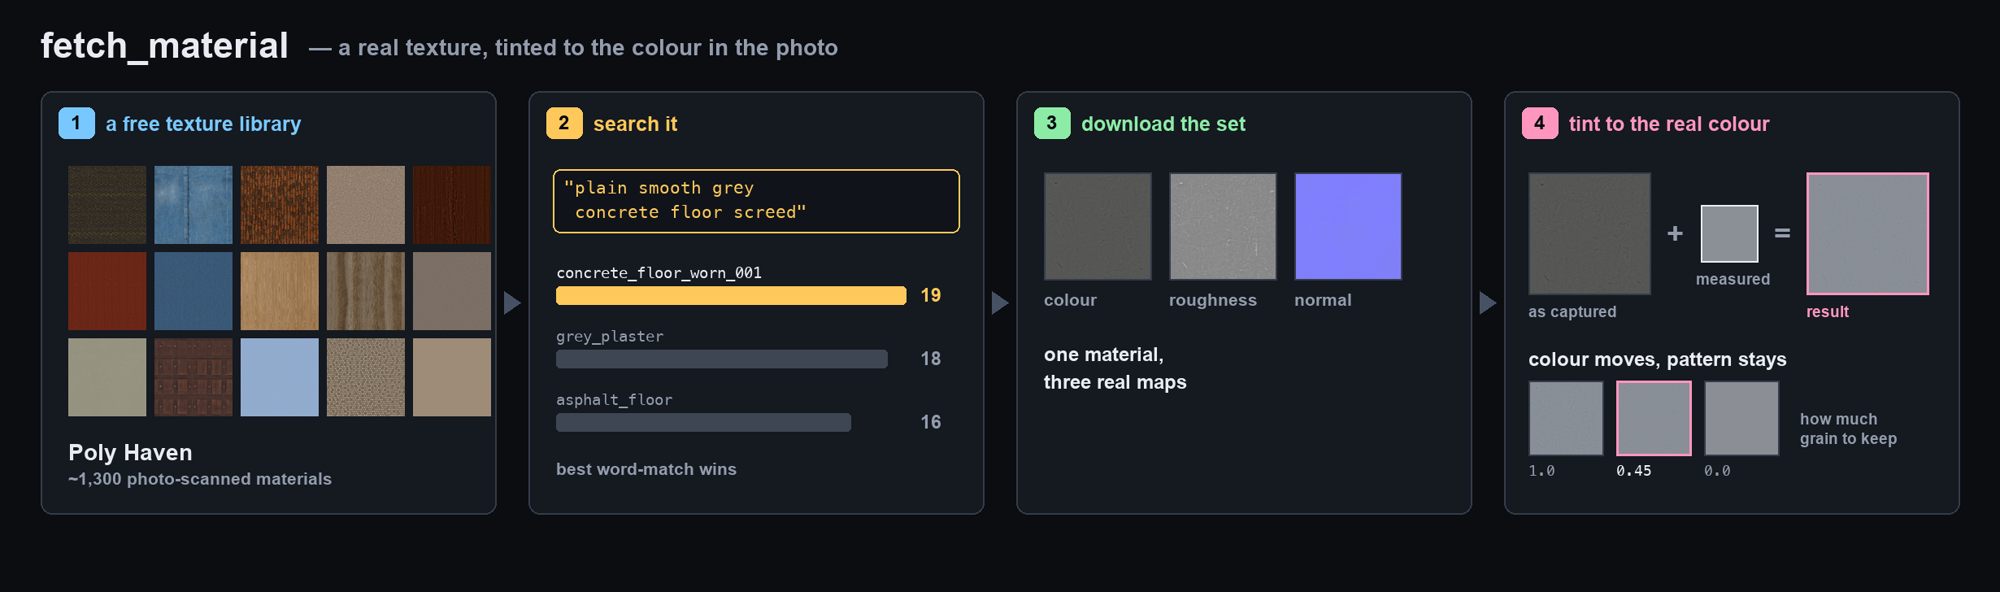
Procedural node materials look flat next to real captured ones. So: search a free library of photo-scanned textures, download the colour, roughness and normal maps, then tint the colour to what the photograph actually shows. The colour moves and the pattern stays.
Quality Control as a Gate
After authoring, the scene must pass a set of deterministic quality-control checks before it can be exported. These checks include collision detection and other tests for geometry, placement, materials, articulation, and scene validity.
Most of that layer is arithmetic rather than a model judging its own work. The geometry and placement checks are deterministic, resolving what has a safe fix and reporting what does not; only the final pass over the room uses a model, working through a fixed checklist. A scene leaves the pipeline only once it clears the gate.
Results
These are two rooms out of more. See the rest in the gallery.
Editing the reconstructed scene
Because the room is a Room.py file, editing it is a prompt away.
It is a programmable room, and a lot of what used to be hard is now one sentence. Rearrange the furniture. Redecorate, pulling assets straight from Sketchfab. Hand it a photograph and ask for that object, placed in the room. And if part of the reconstruction is not right, say so — the agent goes back, focuses on that piece, and does it again.
Intrinsics
A fully authored scene renders perfect intrinsics for free: pixel-exact segmentation, depth, normals and albedo, from the same cameras.
Limitations
- The scenes are not yet simulation-ready. Although the reconstructed environments are interactive, this is not the same as being ready for direct use in a simulator. Making an entire room simulation-ready still requires substantial additional effort. However, when combined with the progress made in ArtiCraft, we believe this goal is within reach. Once the individual objects are simulation-ready, the remaining challenge is primarily to ensure that the overall scene layout is physically valid and suitable for simulation. We expect this to be a more manageable problem.
- The system has not yet been tested at large scale. Our current experiments focus on single-room environments of approximately 50 m² or less. Extending the system to larger spaces, more challenging layouts, and multi-room environments will require further engineering and evaluation. We do not consider this to be the most fundamental challenge, but the system has not yet been sufficiently stress-tested under these conditions. This is something we will keep working on.
Looking Ahead
The pace of progress in agentic systems is extraordinary, and many capabilities that seemed difficult to imagine only a short time ago are rapidly becoming possible. We are excited to see how this line of work develops, and to continue maintaining LiteReality-Agent as a useful tool for the community working on interactive 3D scene reconstruction.
Anyone interested in contributing, experimenting with the system, or exploring related ideas is very welcome to get in touch with us.